

Guide
Overview
This plugin, superSerial, allows seamless serial communication between Grasshopper and Arduino. It facilitates sending and receiving data in various modes, enabling interactive control and feedback for Arduino-based projects. I haven’t tested it on other boards (i.e. RaspBerry) but it should work with any serial com.
Once installed (drop it on the canvas, after unblocking it, if needed), the plugin adds a new menu item called superSerial in Grasshopper. Inside this menu, there is a single component designed for serial communication. This component can operate in four different modes to handle various communication scenarios.
Grasshopper Instructions
How to Use the Component
- Drag and Drop the File:
- Drag and drop the
.ghafile into Grasshopper. - A new menu item called superSerial will appear in the Grasshopper interface.
- Drag and drop the
- Add the Component to the Canvas:
- Open Grasshopper and navigate to the superSerial menu.
- Drag the superSerial component onto the canvas.
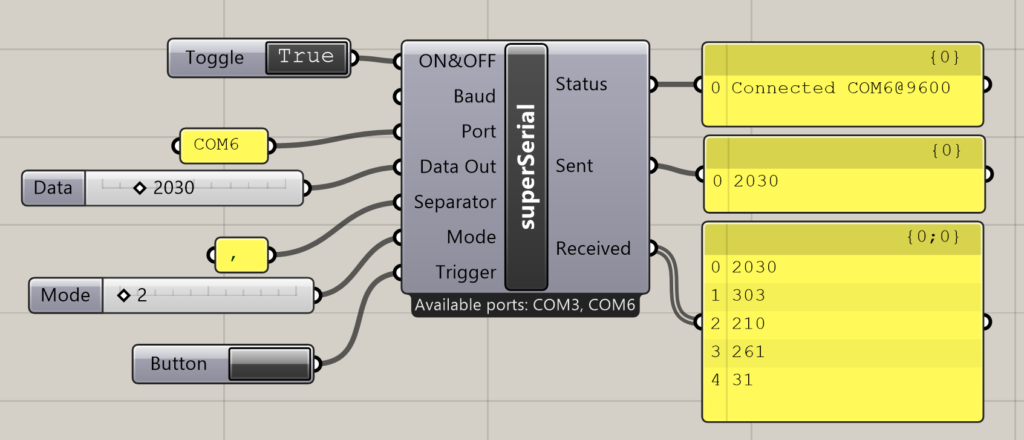
It looks like this:

- Component Inputs:
- The component has several inputs that control its behavior:
- Switch (ON/OFF):
A boolean toggle that enables or disables serial communication.- Set to
TRUEto activate communication with Arduino. - Set to
FALSEwhen uploading a new script to Arduino (to free up the serial port).
- Set to
- Baud:
The baud rate (speed of communication).- Default is
9600, which matches most Arduino scripts. - Other common options include
19200,38400,57600, and115200. - Ensure that this matches the baud rate set in your Arduino script.
- Default is
- Port:
The COM port used by your Arduino.- Check the “Available ports” message at the bottom of the component for your COM port (e.g.,
COM9). - Update this input with your specific port name.
- Check the “Available ports” message at the bottom of the component for your COM port (e.g.,
- Switch (ON/OFF):
- The component has several inputs that control its behavior:

- Data Out:
The data you want to send to Arduino (if applicable). For example, text commands or values.- Separator:
Optional input for a separator symbol (e.g.,,,;, or:). Leave blank if not needed. - Mode:
Select one of four modes of operation:- Mode 0 (Read Only): Grasshopper only reads data from Arduino.
- Mode 1 (Send Only): Grasshopper sends data to Arduino but does not read.
- Mode 2 (Read and Send): Grasshopper both reads from and sends data to Arduino.
- Mode 3 (Trigger Send): Grasshopper sends data to Arduino only when triggered by a boolean input.
- Trigger:
A boolean input used in Mode 3 to trigger data transmission.
- Separator:
- Component Outputs:
- The component provides three outputs:
- Info (Status): Displays connection status or error messages.
- Out (Sent): Shows the last transmitted data from Grasshopper to Arduino.
- Read (Received): Displays incoming data from Arduino.
- The component provides three outputs:
Arduino Instructions
How to Use with Arduino
- Upload one of the provided scripts based on your desired mode of operation:
- Mode 0: Read Only
Upload this script if you want Arduino to continuously send numbers from 1 to 100 over serial communication. - Mode 1: Send Only
Use this script if you want Arduino to turn an LED on/off based on incoming serial data or blink based on specific commands like"superSerial x". - Mode 2: Read and Respond
This script makes Arduino respond with"I have received (value)"whenever it receives data from Grasshopper. - Mode 3: Trigger Receive
Use this script if you want Arduino to immediately flush its serial buffer after receiving any new data.
- Mode 0: Read Only
- Ensure that:
- The baud rate in your Arduino script matches the baud rate set in Grasshopper’s “Baud” input.
- The COM port selected in Grasshopper matches your Arduino’s COM port.
- Important Notes:
- Set the Grasshopper component’s “Switch” input to
FALSEbefore uploading a new script to Arduino, as an active serial connection will block uploads. - Once the script is uploaded, set “Switch” back to
TRUEin Grasshopper to enable communication.
- Set the Grasshopper component’s “Switch” input to
p.s. all the Arduino scketches are included in the zip file, food4rhino.
Modes Overview
| Mode | Description | Example Behavior |
|---|---|---|
| 0 | Read Only: Arduino sends numbers from 1–100 repeatedly over serial communication. | Grasshopper reads these numbers continuously. |
| 1 | Send Only: Arduino turns an LED on/off based on received data or blinks for specific commands like "superSerial x". | Send "superSerial 4" from Grasshopper, and Arduino blinks LED 4 times. |
| 2 | Read and Send: Arduino responds with "I have received (value)" whenever it receives data. | Send "Hello" from Grasshopper; Arduino replies "I have received Hello". |
| 3 | Trigger Receive: Arduino processes incoming data immediately and flushes its serial buffer. | Send "Data" from Grasshopper; Arduino echoes it back instantly and waits again. |
Example Workflow
- Open Grasshopper and place the superSerial component on the canvas.
- Set up a toggle for “Switch” (
TRUE/FALSE) and connect it to enable/disable communication. - Enter your COM port (e.g.,
COM9) into the “Port” input. - Select a mode by entering its number (
0,1,2, or3) into the “Mode” input. - If applicable, provide additional inputs like “Data Out” or “Trigger.”
Troubleshooting
- If you encounter issues:
- Ensure that your COM port is correct by checking available ports in the component’s message area.
- Verify that your baud rate matches between Grasshopper and Arduino.
- Make sure “Switch” is set to
FALSEbefore uploading a new script to Arduino.
- For debugging, use the “Info” output of the component to check connection status or error messages.
This plugin is still in beta, but it works and solved my issues. Let me know if you need further clarification!